Introduction
Sometimes it is difficult to read a seal or signature on a shin hanga print. Unlike many older ukiyo-e prints, the seal could be faded, rubbed, very small or printed in a color that blends into the background color of the print. Crepe prints can be especially difficult due to the process and the resulting smaller size of the seal. In this article I will illustrate one process for clarifying a seal.
The following crepe print has a seal in the bottom right hand corner that is almost impossible to see with the naked eye.
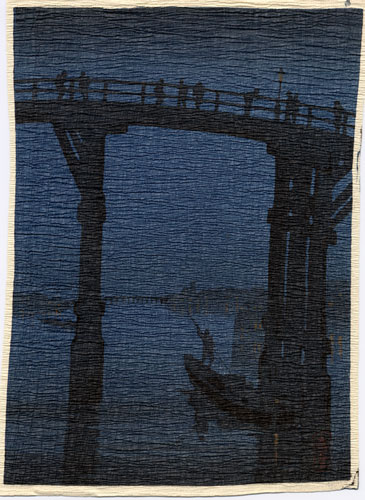
Unidentified print
| Return to top |
1. Capture Image
 The first step in
the process was to scan the image at a high resolution. In this case I used 600 dpi. This allowed me to magnify the image. From this point I made
use of Adobe Photoshop® to manipulate the image, although other applications will probably have similar capabilities.
The first step in
the process was to scan the image at a high resolution. In this case I used 600 dpi. This allowed me to magnify the image. From this point I made
use of Adobe Photoshop® to manipulate the image, although other applications will probably have similar capabilities.
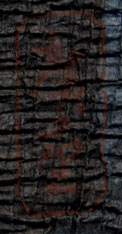
With Photoshop I truncated
the image to include the seal and its immediate surroundings. This greatly
reduced the image size, allowing the computer to process the image more
quickly. However, as the image to the left shows, the result is still not
very legible.
| Return to top |
2. Lighten and Sharpen
 The second step was to
allow Photoshop to optimize the image. This was done by going to the
image menu and choosing 'adjust'. Under 'adjust' I chose 'automatic
levels'. Since the original image was very dark, Photoshop made the
adjusted image much lighter. This approach is most effective if the image
has a relatively homogeneous level of lightness (or darkness in this case).
The second step was to
allow Photoshop to optimize the image. This was done by going to the
image menu and choosing 'adjust'. Under 'adjust' I chose 'automatic
levels'. Since the original image was very dark, Photoshop made the
adjusted image much lighter. This approach is most effective if the image
has a relatively homogeneous level of lightness (or darkness in this case).
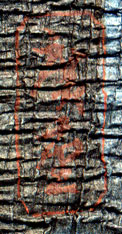
Then I went to the filter menu and chose one of the 'sharpen' filters to make the image less fuzzy. This image shown to the right is greatly improved over the first step image.
In many
instances we might stop right here and declare victory. But in this case
the seal is still difficult to read. Continuing the process, I was faced
with a number of choices. The path I chose seems reasonable but others are
possible.
| Return to top |
3. Reconnect Image
 Crepe images, by their very
nature, have ridges and dark valleys. The latter make the seal characters
and seal border appear broken or disconnected. In the third step I chose to connect the points. That is, I bridged the dark
gaps. This is fraught with danger since I have limited knowledge of Japanese
characters. I attempted to be conservative in my connections but the
possibility exists that I obscured the characters rather than clarifying
them. This sets the stage for the most dramatic improvement in
clarification, next.
Crepe images, by their very
nature, have ridges and dark valleys. The latter make the seal characters
and seal border appear broken or disconnected. In the third step I chose to connect the points. That is, I bridged the dark
gaps. This is fraught with danger since I have limited knowledge of Japanese
characters. I attempted to be conservative in my connections but the
possibility exists that I obscured the characters rather than clarifying
them. This sets the stage for the most dramatic improvement in
clarification, next.
| Return to top |
4. Filter Background
 The problem with the
above image was that its "contrasty" background made reading difficult. In
the fourth step I eliminated the contrast. Photoshop has a
number of ways of handling this problem. By trial and error, I have found
two filters that seem useful: solarize (under stylize) and conte crayon
(under sketch).
The problem with the
above image was that its "contrasty" background made reading difficult. In
the fourth step I eliminated the contrast. Photoshop has a
number of ways of handling this problem. By trial and error, I have found
two filters that seem useful: solarize (under stylize) and conte crayon
(under sketch).
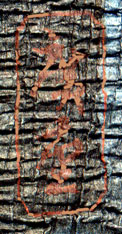
My approach is to apply the filter and then fade the filter (under the edit menu) and use the blending mode 'luminescence'. In the example to the right I used conte crayon. The seal is faint but the background is less distracting. The rationale for the previous step should now begin to be apparent.
Note: in experimenting with the overall process, I found that this step added only marginal benefit, and thus could be considered optional. The 'optional' examples below depict the results without this Step 4.
| Return to top |
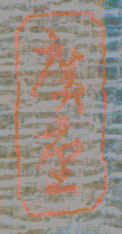
5. Adjust Color
 In the fifth step
I used selective color under (adjust) to bring out the red. I did this by
adjusting reds, blacks, and neutrals. By now the seal was reasonably
clear.
In the fifth step
I used selective color under (adjust) to bring out the red. I did this by
adjusting reds, blacks, and neutrals. By now the seal was reasonably
clear.
The specific process was this: (a) I took the black out of the image's neutral tones, (b) I took much of the black out of the image's black tones, thus fading the background, then (c) I boosted the black in the reds (the seal). Finally there was some optional tweaking to take any red out the background, making the red seal more obvious.
| Return to top |
6. Increase Contrast
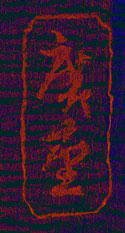
 Last, in the sixth
step I increased the contrast (brightness/contrast) which brings out
the seal to its final level of clarity. While the background becomes more
apparent I find this last image somewhat clearer than that in Step 5.
Last, in the sixth
step I increased the contrast (brightness/contrast) which brings out
the seal to its final level of clarity. While the background becomes more
apparent I find this last image somewhat clearer than that in Step 5.
The image to
the far right was achieved by a similar six-step process, only
substituting the 'solarize' filter for the 'conte crayon' filter in Step 4. Despite the difference in background color, the resulting clarification
of the seal is quite similar to that achieved with the conte crayon
filter.
| Return to top |
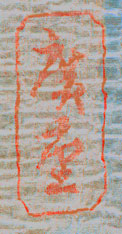
Optional Results
)
) For both of these 'alternative' images, the Step 4 filtering has been omitted.
For both of these 'alternative' images, the Step 4 filtering has been omitted.
The left image shows the characters before I filled in the crepe/wrinkle gaps, and the right image is after the gaps are filled in with a closely matching red color.
I recommend clicking on each image here, to see a detailed pop-up view. They can both be opened and compared side by side.
| Return to top |
Conclusion
The above process is one way to clarify a 'difficult' shin hanga seal or signature. There may be other, more efficient approaches. And this process is only the beginning -- now I can start researching the artist's identity!!
| Return to top |
Many thanks to Donald Schaefer for this useful piece of work. For comments, suggestions and corrections, please send us an email.
|