Repairing Japanese Woodblock Prints
By Thomas Crossland
Introduction |
Dilemma |
Literature |
Materials |
Getting Started |
Small Holes |
Tears
Thins |
Margins |
Backing |
Watercolors |
Shin Hanga |
Conclusion |
Sources |
The Author
Preface
"The collector must remember that he has an obligation to future generations of collectors and to the integrity of the prints themselves to care for them in a responsible manner. We are only temporary custodians of these magnificent works and we must insure that these beautiful prints do not suffer from our neglect or mistreatment." -- Shogun Gallery
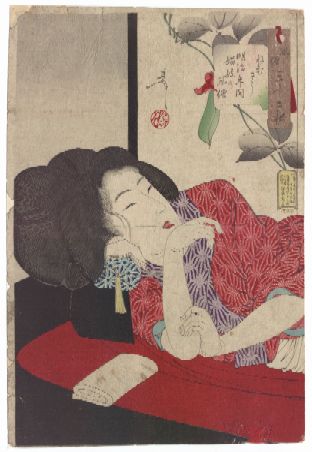
Introduction—An Appreciation ("Ukiyo-e Dreams….")
As a collector and avid admirer of Japanese woodblock prints, on each occasion I spend moments -- be it brief minutes or long hours -- with my prints or admiring the collections of others, I find myself inexplicably transformed not only in time, but also in "place," temperament, and even existence.
Undoubtedly my previous trips to Japan (including a 21 day, 1,000 mile solo bicycle trip of southern Japan) now help to facilitate this transformation, however the same odd feelings were experienced even prior to my first trip abroad.
Words such as "dreamlike," "hypnotic," and "mystical" do not seem to even fully describe the degree to which these magical works of art move me. But I am clearly taken from the present and moved back in time. Current daily concerns and the pull of trivial obligations simply fade away. At the same time, feelings of anger, tenseness, or stress are often so softened that they simply vanish.
Try spending some 30 minutes or so just before bedtime reading any of the wonderfully descriptive texts about old Japan — or do as I sometimes will, taking an actual woodblock to the bedside for viewing — and see what follows as you then fall asleep. It is said that the renowned architect Frank Lloyd Wright, himself an avid collector and connoisseur of things Japanese (but especially woodblocks), always kept a selection of three prized woodblocks on display on an artist's easel in his bedroom. You, too, will likely experience an inner calm and contentment which can linger for hours. It is a blissful inner state of mind which I have dubbed "ukiyo-e dreams".
*********************
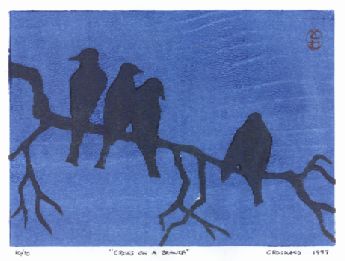 My personal sense of appreciation and respect for this art we call "Japanese woodblock prints" was greatly deepened when a few years ago I spent some 20 to 30 tedious hours to produce my own personal 5 x 7 inch, simple two-color woodblock ("Crows on a Branch"). In doing so, I found myself humbled beyond belief. From this firsthand experience and from the countless hours I have spent in study of this art form, my respect is so heightened that I believe Japanese woodblocks to be clearly among mankind’s finest works of art. The Japanese artisans have so completely captured the beauty and essence of their native land, that it is with awe and admiration we are today able view the recorded visions they've left us in the form of woodblocks. They are truly magnificent artworks — marvels of line, composition, color and mood.
The "Dilemma"…….. Meets Pragmatism
So captured by and respectful of this art form am I, that I find myself quite reluctant to discuss publicly the thought of doing "self-repairs" to damaged prints. To do so—that is, to speak publicly--seems dangerous. In fact, to discuss this topic openly seems almost taboo.
Yet, as a collector of prints, I soon found myself surrounded by a variety of assorted prints, many of which clearly needed some repairs. While occasionally some of this "need" was purely aesthetic, much of the work to be done was simply dictated by the need to maintain the structural integrity of the piece. Missing corners, tears, "thins," brittleness, and wormage often made mere handling of these pieces risky. Furthermore, mounting these individual prints for display became difficult and risky when their edges were so fragile and compromised. And admittedly, as a seller of woodblock prints, the desirability and value of many prints could often be greatly enhanced with a few (seemingly) simple repairs.
To be sure, a professionally done repair would perhaps be preferable. But pragmatism clearly dictated that in the case of many prints, the cost-to-benefit ratio would clearly not be worthwhile. Quite simply, on prints costing under $100 to $200, their value in most cases clearly did not justify the expense and expertise of a professional conservator. What follows then, is a brief synopsis of my accumulated knowledge and experiences gained from repairing my own Japanese woodblock prints. Some comments regarding special considerations for shin hanga prints appear at the end of this article.
Literature
A search of the literature for "repairing Japanese prints", "paper conservation", and so forth soon proved to be largely an exercise in futility and bore little fruit. Little was found of value, and the advice generally given was to trust such repairs only to the (apparently secretly guarded) expertise of a "professional conservator."
Of some value was a scholarly article titled "Japanese Print Conservation" by Keiko Mizushima Keyes (originally appeared in the September 1988 issue of "The Conservation of Far Eastern Art;" brought to my attention just recently by distinguished ShinHanga.net member Philip Roach). This 10 page article is an overview written by a respected conservator who set up her own conservation and restoration studio in California following her training in scroll mounting and paper conservation which she received from Iwataro Oka, President of the Mounters Association for National Treasures of Japan. It provided a few additional insights, but largely reinforced much of what I had already discovered. Most telling was its footnoted mention of the following reference (see below) where it states Schraubstadter’s 1948 treatise to be "the only publication on the subject to date."
Not surprisingly then, of most value in my search for knowledge had been Carl Schraubstadter’s 1948 book Care and Repair of Japanese Prints, which I had stumbled across several years earlier. This obscure reference outlines the accumulated knowledge and experience gained from its author’s firsthand experience gained during his three year long period of print accumulation and residency in Japan from 1915 to 1918.
Although from an earlier generation, Schraubstadter’s thoughts, observations, and experiences often paralleled my own. Schraubstadter, like myself, shared the same fears and self-distrust — the book’s preface states that originally he "feared to repair prints lest he damage them, and (at first) he entrusted the work to professionals." But, frustrated by delays — although I additionally suspect motivated largely by the desire to become self-sufficient — Schraubstadter, with "much trepidation….(soon) attempted some of the work and found it so interesting that he continued, paying for instruction on secret methods whenever possible and gradually evolved his own."
Materials and Supplies Needed
Actually, very little is required in the way of special tools or materials to perform simple repairs to damaged woodblock prints. To get started, you’ll need the following:
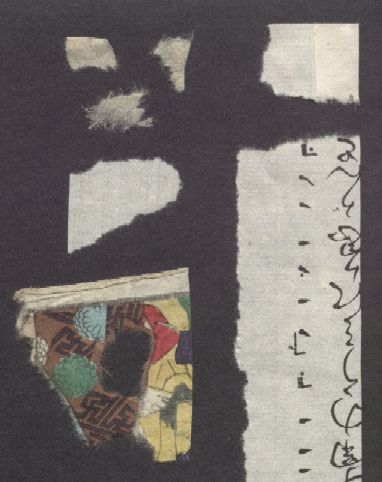
- Japanese Paper
A supply of old, damaged prints is the best source of scraps from which to make patches. By the time you’ve collected prints for a while, you’ll eventually accumulate a few worthless prints which are perfect for making patches. Actually, the more the better, as this makes it easier to match various colors or the varying shades of uncolored paper areas. Also suitable are pages of washi (Japanese paper) taken from old hand-sewn Japanese e-hon books; the full-sheet protective paper folders which accompany some new prints; and even new, handmade Japanese papers.
- Watercolors
Easily obtained, a quality set of artist's watercolors are useful to achieve some close degree of color compensation to new paper repair areas if the appropriately colored patch is not available.
- Glass or Rigid Plastic Sheet
Useful for pressing the repaired area flat until it dries. Something slightly larger than oban size (say 10 to 12 inches x 15 to 18 inches) is convenient. If you happen to have accumulated any of the heavy, Mylar "museum sleeves" in which prints are sometimes stored, these work very well.
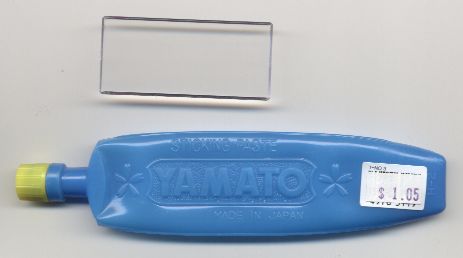
- Japanese "Nori Paste" Glue
Widely available to Japanese schoolchildren, this "rice paste" in a tube is both inexpensive and a true joy to work with. (I've since wondered, "why did we as non-Japanese children suffer so long with Elmer's Glue??") You'll find this product readily available in nearly any Asian foods market; just look in the "school supplies" for the variously colored, plastic (toothpaste-like) squeeze-tube containers.
- Glue Spreader Tool
Most any kind of small, straight-edged piece of plastic is very useful to properly apply and spread the nori paste onto patches larger than about one square inch in area. A 1 inch x 3 inch piece of Plexiglas is perfect, but nearly anything of similar size will be satisfactory (half of an inexpensive, clear plastic, 6-inch ruler would be perfect).
Getting Started
Before beginning, first take the time to make available both a time and place where you can work comfortably, safely (that is, safe for the prints), and away from distractions. Repairing artwork, as you will soon discover, is of itself "an art," and so, it does take some degree of thought and concentration. Avoid areas which can present a risk to your prints. The kitchen table or other areas where food and drink are handled, or areas with active and inquisitive children are examples of areas to best be avoided. A bright, indirect light source is also helpful.
The best overall advice for the beginner is to start slowly — carefully and thoughtfully observe as many previously repaired prints as possible, then begin by doing a few "simple repairs" to prints of your own which are of little value. And remember, the easiest repairs to make with satisfactory results are small ones.
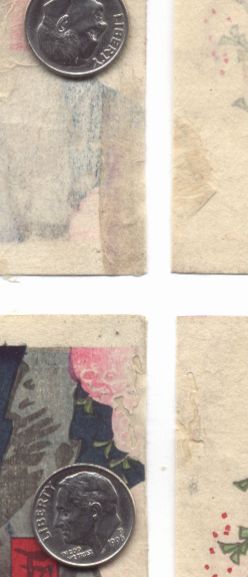
The Repair Process--Small Holes
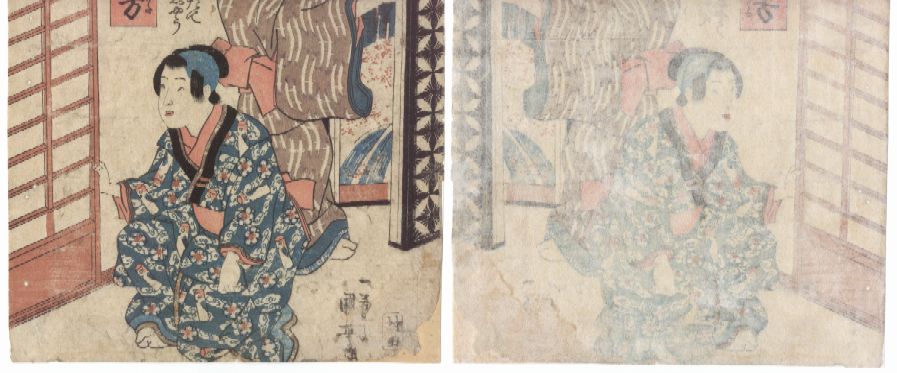
 When the novice first begins attempting to make repairs, not surprisingly the easiest and most successful learning efforts are those made to repair small holes or short tears. The first two key points to remember are (1) to always make patches with scrap paper somewhat thinner that the print itself, and (2) to always hand-tear the shape of the patch used. Both of these factors will contribute toward a more satisfactory, more secure, and more invisible repair. Being of thinner paper, your patch will be much less likely to show any "edges" or outline when viewed from the front side. The same is true of torn patch edges; the fibrousness and resulting tapered thinness not only help the patch to adhere better, but also aid in helping to make the patch more invisible. The absence of any scissor-cut straight edges clearly helps the patch to blend in.
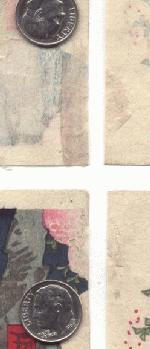
In the case of small hole repairs, the first consideration must be (3) to match as closely as possible either the color or the tone/shade of the paper if an uncolored area. This is clearly where your accumulation of old scraps will show their value. Schraubstadter even went so far as to recommend maintaining a "scrapbook….divided into sections for red, white, blue, yellow, green, black, purple, brown and toned (into which these scraps were) glued with paste." I have found that what works well for me is simply a set of folders in which I loosely categorize my scraps by color. Pick out several closely matching shades of color (or tones, if uncolored) as possibilities, testing each piece individually by holding behind the hole and viewing from the front side. While you may not be able to find a perfect match, make the best choice possible. (If the color needed simply is not found, artist’s watercolors may be the answer. More on that later.)
Having located the correct color, next simply tear out a small, somewhat irregular shaped patch which is only slightly larger than the hole. Re-check one last time for fit and correct position, then apply the nori paste. For small patches, I have found this best done just using one fingertip. The next key point is to (4) be sure to spread the glue as thinly as possible by applying it (generally) only to the surface of the patch. The exception being is that the case of a larger hole — in order to avoid glue on front areas of the patch — it is best to in this case, apply the glue separately to both the edges of the hole (from the backside) and to the outer edges of the patch itself. Finally then, lay the print face down onto a non-porous surface and press the patch firmly into place. If some small amounts of the nori paste squeeze through to the front side, this should be easily and immediately wiped or blotted away; the tip of a white paper towel works well. Set out to dry.

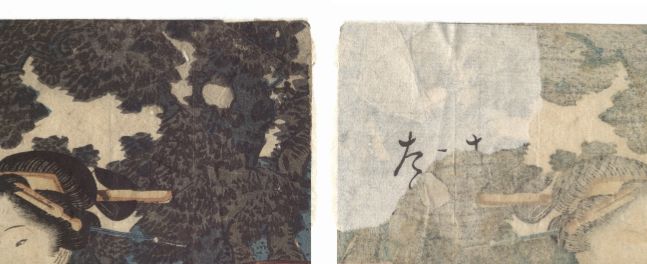
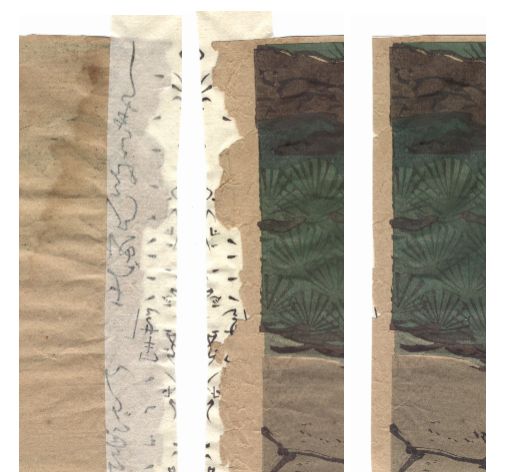
The Repair Process--Tears
In the case of tears — where the repair is totally done from the backside — the color or shade of the washi used is of little importance, since it is cannot generally be seen to the front. This is where the thin pages torn from an old, hand-sewn Japanese e-hon book are useful. The un-printed edges or margins can be used for repairs behind uncolored areas of a damaged print, while the black kanji-lettered scraps can usually be safely used as patches behind darkly printed areas of a damaged print.
Again remember, when it comes to patches, thinner is better and somewhat irregular, torn edges are preferable. About Ľ inch of overlap from the edges of the tear seems to be adequate (that is, a patch about ˝ inch wide by the length needed), being sure to allow for an extra "tab" of patch to extend beyond the outer edge of the print which can later be carefully trimmed off evenly with the print’s original edge after the glue has dried. Hand-tear the correct patch shape you’ll need, carefully checking it for correct fit prior to gluing.
As before, the key point again is to be sure to spread the glue as thinly as possible while applying it only to the surface of the patch. On all but the smallest of patches, this is where the flat, plastic glue-spreader tool is invaluable. First, lay out a couple sheets of clean scrap papers which will catch the glue excesses. Next, carefully align the print’s torn edges — always checking first from the front side for correct fit and proper overlap — then lay the print face down onto down onto this clean scrap of paper. Then, after squeezing a dab of nori paste onto the edge of your tool, (5) use the plastic glue-spreader tool to spread the glue evenly and very thinly across the back of the patch. With the patch laid face down onto another scrap of paper, spread the glue in several directions, allowing some of the paste to extend beyond the patch’s edges. Then, as before, simply press the patch firmly into place. Any excess amounts of the nori paste should be easily and immediately wiped or blotted away, and the extra (overhanging) "tab" of patch can be later trimmed flush with the original paper’s edge once the paste has dried. Set out to dry.
The Repair Process—"Thins" (typically corners)
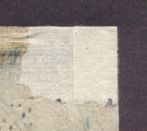 Actually very similar to the process of repairing tears, thin corners are often similarly in need of reinforcement. These "thins," as they are called, often result from when prints have been (torn) removed from prior mountings; a portion of the print’s papers have been simply torn away (separated), leaving the resulting corner thin and weak.
However, differing from the case of tears (where the repair cannot generally be seen to the front), at times due to the thinness of the print’s corners more care must be given to correctly match the tone or shading of the paper. Beyond that consideration, the repair process is essentially the same.
Again remember, when it comes to patches, thinner is better and somewhat irregular, torn edges are preferable. Prepare a slightly larger patch reinforcement of the correct tone, usually somewhat of a triangle shape with the hand-torn edge on the diagonal. And, as in the case of repairs to edge tears, extra patch material should be allowed to overhang the print’s two corner edges. Spread the paste very thinly and uniformly, then press the new corner firmly into place—as before, this excess (overhang) will be simply trimmed flush after the glue has dried.
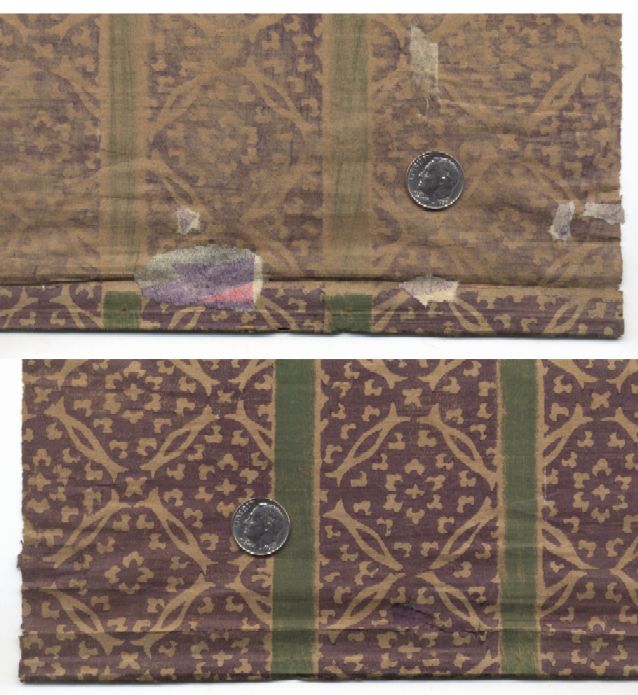
The Repair Process—Margins (not recommended for beginners)
Occasionally, one will encounter entire margins which are in need of reinforcement due to multiple tears, thins, missing pieces, or even brittleness. The considerations and process are quite similar to those just mentioned above; again, the tone or shade of the print’s paper should be matched as closely as possible, however complicating this search is the need for a long length of patch material. Also complicating the process are the shrinkage and subsequent curling or wrinkling encountered when attempting such large repairs. For this reason, such repairs are often best not undertaken by those without some accumulated experience or those weak of heart.
As mentioned above, generally a long, hand-torn edge is preferable, although if the repair paper is quite thin, a straight cut is certainly acceptable. Always true in the case of repairs extending to the edges of a print, allow for a little "excess" patch material to overhang the intended repair. (Do not attempt to glue on the final straight edge.) Finally, as in the case of hole repairs, the paste should be applied in two steps — first to the "back top (irregular) edge" of the print itself, then to the "lower" (shall I say, "interior") edge of the patch. Especially true in the case of these large patches, use the plastic glue-spreader tool to spread the glue evenly and very thinly across the back of the patch. When finally mating the two papers, in this case it is often easiest to do the opposite of before — that is, laying the patch itself flat onto the work surface, then lowering the print onto its new margin. Press very firmly, gently wiping up any excess paste.
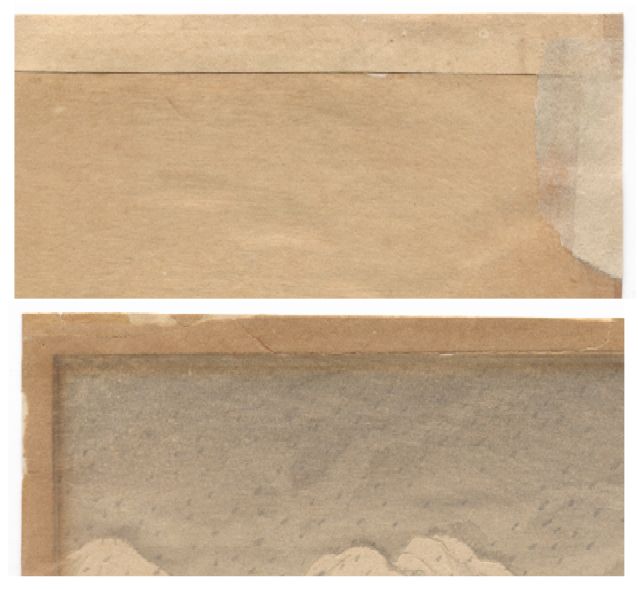
As mentioned, complicating the process of attempting such large repairs is the shrinkage and subsequent curling or wrinkling frequently encountered during the drying process. Somewhat helpful in this regard, is the use of a large glass or plastic sheet to press the print/patch flat while they slowly dry. (In the case of a straight, long margin repair, a long plastic ruler can be used to maintain flatness.) I have found that alternately and frequently exposing the print to open air then returning it to the pressing process seems to work best, since simply leaving a freshly-glued print under glass doesn’t allow much drying to take place.
The Repair Process—Backing an Entire Print
Finally, one will also occasionally encounter situations where an entire print is so structurally compromised and in need of reinforcement (due to multiple tears, thins, missing pieces, severe wormage, or even brittleness) that about the only solution is to entirely "back" the print with another sheet of paper. In fact, many prints encountered or purchased today have come to us as collectors already in this state—that is, backed many years ago when they were still likely in Japan and were at that time collected into albums.
Not surprisingly, again the considerations and process are quite similar to those just mentioned above. Paramount is the tone or shade of the new backing which should be matched as closely as possible to that of the original print. And again, this time complicating this search is the need for a full sheet of material. In this regard, I have occasionally used the full-sheet, acid-free protective paper folders which accompany some new prints. Certainly also acceptable would be even new, hand-made Japanese papers.
Although the process of applying an entire full sheet of backing may seem daunting, I have experienced good success when enlisting the use of a frame shop’s large, 300 psi vacuum press. (This is the equipment frame shops typically use to glue paper posters flat onto sheets of foam-core backing.) Gluing is generally done entirely to the full sheet of new backing paper, however if there are any large holes or missing corners, these may be best glued by their backside edges. Also very useful in addition to the little plastic glue spreader tool is a 6-inch wide hard rubber glue roller which the frame shop will likely have on hand.
Using a slightly oversized backing sheet (remember, all excess will later be trimmed off), I have found it best to first lightly "trace out" in pencil the approximate borders of the print itself as a rough guide as to where to spread the paste. When ready to spread the nori paste, one must strive to move quickly and deliberately, using both the flat plastic and the roller to spread the paste as thinly as possible. The nori paste tends to dry rather quickly, so when doing large areas, one must move fast. Next, lay this freshly glued backing onto a sheet of flat, nonporous material, such as a scrap of foam-core. It is very important to use a material (for this backing sheet) to which the glue will not adhere. Next, carefully lay and gently spread the print out onto this flat, glued sheet of backing — simply "bow" the print in the middle and allow its backside to correctly first contact the center portion of the glued backing, smoothing and spreading it down in all directions. Caution and care must be exercised, as you will not likely be given a second chance to reposition if done poorly. Finally, lay a final sheet of nonporous material on top of the print before inserting this all into the press. Even better than a scrap of foam-core alone is to use a sheet of plastic wrap (yes, Saran Wrap) which will definitely not adhere to any excess paste which will squeeze out and will easily peel away after all is removed from the press. Then lay a final sheet of smooth foam-core scrap on top. (Hint: Do not use a scrap of cardboard — I’ve made this mistake, and it invariably will leave unwanted parallel lines.)
After 3 minutes spent inside the vacuum press during which it achieves its 300 psi of pressure, your print will come out in wonderful condition (guaranteed flat). As you will also discover, this process additionally has the benefit of virtually removing any previously evident small surface wrinkles, as they are quite simply pressed flat.
Remove the print from the press and peel away the plastic sheet. Gently wipe away any excess paste and set aside to dry. As before, drying is best achieved alternately and frequently exposing the print to open air, then returning it for a time below a sheet of glass. If simply left under glass, drying will not take place. Surprisingly, the subsequent curling frequently encountered in other repairs seems to be much less of a problem during the drying process.
As indicated, good success has been constantly achieved when using a vacuum press. I have never attempted to "back" a print without its use, although I suspect much wrinkling would be encountered. (Large, less than satisfactory, patch repairs — such as 3 to 4 inches — have led me to this assumption.) It would be most interesting and very instructive to learn directly from Japanese paper artisans how they have achieved such wonderful results when they back entire prints.
The Repair Process—Color Compensation Using Watercolors
As suggested much earlier in this article, it is at times seemingly impossible to locate the correct color needed for a repair to a damaged colored area of a print. Certainly, at times a close enough match can be made where the results will be satisfactory. A limiting factor can also be the choice of available colored scraps from which to choose, especially if one is new to this endeavor. And finally, in some cases the print’s damaged area may involve several colors or patterns which are virtually impossible to simply tear from a single scrap.
For these reasons, it is occasionally necessary to become more of an "artist" yourself, indeed coloring or even drawing the combination of colors/artwork needed. While absolute perfection may not be achievable, oftentimes a close match which will nearly blend in can be achieved. In any case, it will certainly be much better than looking at a hole in the print.
Coloring (or re-coloring) should never be attempted directly onto a print itself. In fact, in keeping with most widely accepted conservation practices, nothing that we do to a print should be undertaken which is not reversible if desired. (Please note, all "patch-work" previously mentioned is considered reversible as the nori paste is water soluble.) That stated, it is certainly acceptable and at time desirable to color-compensate patch areas as needed.
Using several scraps of washi (Japanese paper), correctly matching existing area’s colors is simply a matter of experimentation and practice. Nearly any type of artist’s watercolors seems to work, however, I have found that the sets of assorted colors which come in liquid form in little plastic tubes to be the easiest to use. The trick is to mix up and paint various shades of color onto several of your intended scraps, as you will discover the original wet color can look somewhat different when dried. Press flat while drying, they simply proceed as above.
Shin Hanga Repairs
As for repair considerations unique to shin hanga, two differences come to
mind.
First, many of the shin hanga prints we enjoy today are printed
using papers much heavier than the very thin sheets common to older
ukiyo-e. As a result, this use of heavier paper tends to make needed
repairs a bit more forgiving, since (1) the possibility of wrinkling is
lessened, (2) the chance of front-side "show through" is lessened, and (3)
the less severely toned papers are easier to color (tone) match.
Second, being newer prints, one seldom seems to see the pervasive wormage or missing corners so commonly seen with older ukiyo-e. In this respect, generally the repairs needed to (newer) shin hanga prints are easier to perform. That said, it logically follows that needed repairs to older, severely damaged ukiyo-e can often be more prudently undertaken without remorse due to their already severely diminished value. On the other hand, I would then additionally caution that a seemingly "simpler" repair to a much newer
(and possibly far more valuable) print should be undertaken with more caution.
Conclusion
Hopefully, woodblock print owners and collectors who read this article will have learned enough and have been encouraged enough to where they will consider attempting to undertake a few simple repairs on their own. Of course, prints of any significant value should, unquestionably, be taken to a skilled conservator if repairs are needed. However, oftentimes all that’s need is a relatively simple, five minute repair. And not surprisingly, in learning to do so the collector and lover of woodblocks will also experience much satisfaction and a true feeling of accomplishment.
In closing, it is probably best to restate the advice given earlier. That is to start slowly, carefully and thoughtfully observe as many previously repaired prints as possible, then begin by doing a few simple repairs to prints of your own which are of little value. And remember, the easiest repairs to make with satisfactory results are small ones.
Good luck — enjoy your prints!!
|
Photographs and original text as written and submitted by Thomas Crossland for this article are his property, copyright © 2000, all rights reserved.
Your feedback is welcomed -- please send in your comments and suggestions.
Editor's note: The author's work presented here should be considered along with other sources. As noted elsewhere in this site, this article is offered in the spirit of providing broad and detailed material of interest to serious shin hanga collectors. Additional input and comments are encouraged.
|
Sources
general
McClain’s Printmaking Supplies
PO Box 40163
Portland, OR 97240-0163
Tel. (800) 832-4264
washi
Hiromi Paper International
2522 Michigan Avenue, #G-9
Santa Monica, CA 90404
Tel. (310) 998-0098
Fax (310) 998-0028
info@hiromipaper.com
www.hiromipaper.com
plastic "museum" sleeves (HIC print protectors)
"The PVC used contains no stearates or
plasticizers and is non-migrating."
West Coast distributor:
Tamerica Products, Inc.
1560 Archibald Ave.
Ontario, CA 91761
Tel. (800) 822-6555
books on Old Japan
About the Author
Prior to the release of this article, little of a factual nature was known about its author -- although both speculation and even innuendo had been circulating for some time. (It was reported recently that disparagingly spoken words of a "Brit" were even recently overheard at an international woodblock show held in Tokyo spoken in reference to the author.)
Seemingly born with an inner and innate love of "things Japanese" and a lifelong admiration of Japanese woodblocks, the author's serious collection of these woodcuts began in the early 1990's. Early on, their acquisition became both compulsive and addictive. It took some time, however eventually he learned the painful lesson to not jealously covet other's woodblocks, but rather to simply marvel at and be lost in their shared beauty.
In 1995, longing to experience the source and inspiration of these old woodcuts, the author packed his bicycle into a box and left to explore Japan. Departing through Kobe shortly after its devastating earthquake, he began a 21-day, 1,000-mile solo bicycle odyssey of southern Japan, circling both Shikoku and Kyushu Islands. Traveling alone with a vocabulary of perhaps barely 50 words, rural "old Japan" was truly experienced. Words of this trip are often said to be affectionately spoken by the author as he recalls "the most memorable and rewarding experience of his life."
Returning in the fall of 1997, the author's next solo bicycle trip was north through Kyoto and via Lake Biwa to the Noto Peninsula of Japan's north shore. This 12 day, 700-mile journey led him into the backcountry known simply as "inaka." There, he slept in his small tent, alternating with nights spent inside 200-year-old, grass-roofed farmhouses known as "minshuku," the modern day equivalent of a bed-and-breakfast.
Always having been one who struggled with any foreign language, it is at first perhaps difficult today to understand his apparent grasp of both the Japanese culture and its language. While admittedly, much can be learned by both reading and from first hand experiences, the author — long thought to be dyslexic — has continually struggled to learn this complex, foreign language known by some as the "devil's tongue." All this changed wonderfully however with his marriage in early 1993 to his Japanese bride, Hisako. She has worked hard with him and has fortunately and seemingly single-handedly helped him to overcome this deficit. It is rumored however (and quite likely correctly), that she alone is the source of his strikingly accurate and complete Japanese translations of his many kanji-captioned woodblocks.
Returning finally to the author's passion, he is often found to be speaking, not surprisingly, of woodblocks. While readily admitting that each of us struggles with some form of inner demons, the author's affliction has proven to be at once both a blessing and curse. While others are possessed by the various "evils" and "curses" such as greed, their job, or perhaps the grip of drugs or alcohol, the author's addiction has proven to be similarly strong. Attempts at therapy, sadly, have not provided any help or relief. Yet, despite its costs both psychic and monetary, his "sickness" has been perhaps a bit of a blessing. Yes, admittedly, he is possessed. But one must also ask, "Is he not at the same time also blessed??"
|
Except as noted, the original content herein is the property of
The Shin Hanga Skull & Bones Society (TM).
Copyright © 1999-2004. All rights reserved.
Other trademarks are the property of their respective owners.
Comments?
|